Monday, March 17, 2014

Strehla, the solo play test, part II


Second turn, 5.00-6.00 am:

The Austrian corps of Kleefeld and Wurzburg close on the Prussian right wing: Kleefeld bypass Laas and send the Croats toward the wood, whereas a brigade from Wurbzurg cavalry charges the Prussian uphill and his infantry attacks prussian guns

  
Guasco corp, a single point from the exhaustion, reply behind Clanzschwitz waiting for a new prussian cavalry attack:


The sabre gleaming in the sun, the Reich Hoenzollern Cuirassiers and the Austrian Carabiniers and Horse Grenadiers charge prussian infantry on the Durrenberg:


to be repulsed back in disorder as well as Puebla Infantry (proxy for Macquire, Luzan and the grenadier coys):


On the other end of the battle the Reichsarmee slowly climbs the Strehla plateau, its second line division forming a “Blenheim style” column of attack against the town and the cavalry wheeling on the left wing (Reich infantry is "Poorly Trained" which means that each facing change cost 1/2 movement allowance: this makes the approach painful and slow in V&B):


however the weak-morale infantry is disordered as soon as it came under the range of the prussian battalion guns deployed on the city limits (the prussian disorder chit is a consequence of the movement into the city: notice that in this picture I changed the original decorative town base with a more practical base with the space for two linear base. Indeed I made both kind of bases, one nice to see, the other practical to use, and switch between them as needed).


It is the Prussian turn: on the right wing the guns on the Durrenberg hit and disorder the hungarian regiment of Forgach (proxy for N. Esterhàzy), whereas in the plain between Durrenberg and Strehla Kleist cavalry replies behind the timely arrived infantry reinforcements: it gained time to allow for infantry deployement and it becomes available for another attack elsewhere:


notice the right-angled regiment which makes the line "cavalry flank secure".

In the Strehla sector, the already disordered Imperial infantry fails a further morale test and rout (red and white chits), disordering in turn other two regiments, whereas Furstemberg took an hit from the Prussian guns. Roth division is in total disarray, and the first Imperial attack against Strehla falters (to recover from the rout, the corp commander must be attached to the units which become “permanently disordered –red chit- and lose the battalion guns: indeed a recovered routed unit is of limited use for the rest of the battle).


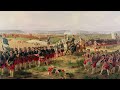
This is the situation at the end of the second turn:

 the Durrenberg...


                                  ...and Strehla:

Sunday, March 16, 2014

Strehla: the solo playtest, part I


To test the scenario I decided to playtest it, unfortunately by myself since there are no V&B players close enough to me. First of all a look at the deployed armies: notice that since I have not all exactly the units required, there is nearly a 30% of “proxies”. For instance the role of Zweibrucken is played by Daun, whereas the former saxon regiment Hauss is played by a Prussian Garrison regiment and so on.


An overview of the deployed armies;


the Reserve corp with the Prince of Stolberg;


Guasco grenadiers on the Ottenberg;


the Prussian right wing on the Durrenberg;


the Prussian Cavalry and the left wing in the Camp;


The Reichsarmee.


The lonely grenadiers in Klein-Rügel waiting for the Imperials.

The First Turn, 4.00-5.00 am:

The burden of the attack is on the Austro-Imperials. They enter the Kleefeld command whose plan is to point on Laas and then contest the wood with the Croats, whereas Blau-Wurzbug and the Hussars shall attack the Durren Berg on the reverse.


The Guasco corps moves downhill from its position on the Ottenberg to attack the Durrenberg, with the two right flank austrian regiments deployed “en potency  (just outside of the picture...), whereas the Reserve corps closes on the Durrenberg from the other direction. The Prussian right wing seems in a hopeless position.


In the mean time the Reichsarmee moves to attack Strehla and the fortified camp, with the cavalry brigades moving left to contest the plain within Strehla and the Durrenberg.


However the lonely Grenadier battalions Lubath and Burgsdorf entrenched in Klein-Rügeln repulse the attackers (in V&B terms Baden-Durlach –proxy for Rot Wurzburg- fails morale test and is disordered – blank chit -, falling back and disordering in turn Baden-Baden), regiment Furstemberg exchanges a fruitless fire with the grenadiers:


It is the Prussian turn: the grenadiers wisely leave Klein-Rügeln and goes back to the city (becoming disordered); three regiments  moves from the entrenchments towards the plain between Strelha and the Durrenberg to help the right wing:


At the same time Kleist cavalry falls on Guasco exposed right wing (the rightmost regiment is “flank unsecure” in V&B terms, with morale penality in the pre-combat morale test) to allow the reinforcing three regiments to deploy in the plain:


The infantry on the Durrenberg becomes stationary (a unit which doesn’t move can become stationary, with additional benefits on combat: it isi indicated by the green counter) and secure the flanks to better receive the inevitable Austrian onslaught.


The Prussian cavalry attack is successful: regiment Sincere (proxy for Pallavicini) fails the morale test, both regiments lose the melee. Sincere routs and is destroyed, Niepperg (proxy for Sachsen-Gotha) is repulsed in disorder with loss. The Prussian retains control of the cavalry which change facings to search for new targets on Guasco completely open flank:


This is the situation at the end of the first move:


To close the post, another near-contemporary print (1790) of the battle:


Saturday, March 15, 2014

The action at Strehla, August 20, 1760


Strehla is one of those lesser-known, middle-sized, uneven and asymmetric actions between the Reichsarmee and the Prussians which makes some delightful war-game scenarios, as that done by Keith in his blog. The action is well described both in the Kronoskaf article and in Duffy’s 2nd volume on the Austrian Army, with the honour of 3 pages and 2 maps nonetheless. Basically it was a multiple-column attack on a Prussian camp on the left bank of the Elbe, upstream of Torgau.
The plan was for the Reichsarmee to “fix” the Prussian left, and for the Austrians to turn the right wing with a long circuitous march (in some sense a Torgau in small scale…), a further feint against the right wing made by the Austrian grenadiers.
However something went wrong: the Imperials made only some feeble demostration against Strehla allowing the Prussian to shift troops between the wings, and the Austrian cavalry action against the Prussian right ended in a fiasco. Stolberg called off the action and the Prussian wisely retired undisturbed overnight.

As far as the terrain is concerned, we have many contemporary prints like this one:


and both Kronoskaf and Duffy have detailed maps of the action. By using the modern satellite pictures, we may have an idea of the main course of the action:


Accordingly, I arrived at the following Volley & Bayonet map, where I departed from the custom in V&B whose lattices are 1 foot squares: I followed continental Europe system of measure here….(click on the map to enlarge):


here each square is 25 centimeters, so the whole map is 100x200 cm and the scale is 1 Km=36 cm, that is 1:3600; Strehla is a double sized town, Laas is a town and all the others are villages. The river Elbe is unfordable and there is a wood near Laas. The Durren Berg is a two-level hill, the others are one-level. The Village of Klein-Grossen can be occupied by a full regimental base insted of a a skirmishers base.

The order of battle is from Kronoskaf. Since V&B requires rosters, I prepared the following rosters in PowerPoint, the “boxes” representing the various “columns” for the Austrian and the “wings” for the Prussian.


Prussian Initial deployment:
Hulsen, the Left wing and the Field Artillery are deployed behind the entrenchments, the FB Wunsch inside Strehla and a Grenadier unit in Klein-Grossen.
The Right wing with the Heavy Artillery is deployed on the topmost part of the Durrenberg;
The cavalry is deployed midway between the entrenchments and the Durrenberg.

Austro-Imperial Initial deployement:
Guasco command is deployed on the Ottenberg;
Stolberg with the Wurzburg command are deployed behind the line B-B;
Zweibrucken with the Hauptarmee are deployed behind the line A-A;
Kleefeld command enters the first turn from the point C.

Terrain features
Klein Grossen is treated as a village but can be occupied by a regimental base.
The entrenchments are Field Works
Laas is a Wood building town
Strehla is a Stone building town

Scenario notes
All formed infantry have battalion guns. All formed units are treated as NE (no elites), apart the Grenadiers of both armies which are treated as Shock Troops (*) and the Luzan/Macquire regiment which is portrayed with Grenadier present (g) to represent the converged Luzan/Macquire/Esterhazy 4 grenadier coys that are fudged in the unit for game purpose.

To reflect the Imperial lack of confidence and consequent inactivity I choose not introduce a Special Rule to artificially “balance” the battle. Instead I followed the proposed Army Lists which gives Morale 4 to all Imperial regiments which are Poorly Trained (PT). This doesn’t apply to the Roth, Blau Wurzburg and Mainz-Lambert Regiments and to the Austrian/Imperial Cavalry Brigades.

Victory conditions
In the real battle the Prussian survived the action against the odds inflicting more loss to the enemy. Accordingly it seems reasonable to ask the Austro-Imperials to exhaust all the Prussian division within a given number of turns, for instance 4 or 5 (the real battle started at 5.00 am and ended at 7.00 am which are 3 one-hour turns in V&B) to win the battle. The Prussian wins simply by avoiding this.

With all this in mind I'll try to playtest the scenario. This is my “rendering” of the map on a 100x200 table:


In the foreground the Durrenberg with Laas and the wood on the left side and the Ottenberg on the right side of the valley. Far away the Prussian entrenchments, Strehla and the Elbe river. A close-up of Laas and the Durrenberg:


and of the Town of Strehla and the Elbe with the Prussian entrenched position:


By the way this is the actual Strehla, probably not so different from the one looted by the Prussian Freikorps:


Next time the playtest.

Wednesday, March 12, 2014

Russian generals


As I said in the previous post, I didn’t remained totally idle in the past year. For instance, last summer I painted some more Russian generals for the Holowczyn scenario:


General Feldmarschall Count Boris Scheremetiev (1652-1719), the overall commander of the Russian Army. According to Konstam “his generalship was solid rather than inspired”. At Holowczyn he arrived late on the scene of the swedish breaktrougth. At Poltava was in command of the foot. He is the tallest guy in the picture, from Mars Saxon Infantry. The other figures are Strelets.


Here he is in full studio armour: 


and in a couple of contemporary prints:


Brigadier General Willim von Schweden (or Schweiden, in green coat) appointed in 1704 and Ivan Chamber (in red coat) appointed in 1703, Repnin’s subordinates, both from Mars Saxon Infantry:


they were in charge of the Russian foot behind the entrenchments. Schweden was killed leading a counterattack of his brigade against Sparre 6 battalions.

Major General von der Goltz (one of the many Saxon officers named Goltz in Peter's Army), commanding the Cavalry, committed piecemeal in the battle:


I represented him dismounted with an Horse Grenadier orderly, the General from the Mars Saxon Infantry whereas the Horse Grenadier is from Mars Swedish Infantry.


Two of his subordinates are the Brigadier Von Hessen-Darmstadt (heavily converted from Strelets, the torso from a foot officer):


and Ifland (a Zvedza Russian Dragoon officier in origin with an added sash), whose dragoons were dismounted (and probably asleep) when the Swedish crossed the Vabijti:


Sunday, March 9, 2014

Still fighting...


Hi, after nearly one year a new post... Indeed I was busy and my hobby was placed in 2nd line. However, as I shall show in the next posts, I wasn't completely idle.

Today I'll show "where the action is" and some appetizers from the next post I planned. First of all, my workplace:


on the left the Italeri French Napoleonic Dragoons on the pipeline, whereas on the table some 6mm and the Hat French Light Infantry...never told about my 1/72 plastic Napoleonics?

This is my small Military History/Uniformology/Wargame & Boardgame library. However most of the data I have are digitalized: I think i'll be forgiven if I don't post a picture of an Hard-disk....


To finish the post, two pictures of my plastic (with some lead) 1/72 Napoleonic collection. It has a nice story. I started to paint plastic napoleonic in 1976 when on the market there was only a limited choice by Airfix. The collection was "reinforced" by some 25mm Minifigs. Then the collection took dust for many years, mainly because I was concentrated on the 6mm project. (take note: I am not  a "fast painter"...). The final "coup" was when in 2002 the 1/72 minis were vandalized by my 3 y.o. son...their resting place was a bag.

Then in 2006 I took them from the bag and with my surprise I realized that they were "not so badly destroyed". Surprisingly, the Humbrol paint survived and the damage was recoverable. It took two years to restore the whole group. What we can see is the original collection with the newcomers, painted after 2006 and mainly Hat, Zvedza, Strelets and Esci/Italeri.

I'll post the various regiments in detail, sooner or later. Today a "group picture": say "cheese"....


More to come....